This tut will teach you how to stream music, photos, and videos (even MKV which the PS3 doesn't usually support). It's pretty simple too.
1: Go to this link and download the version that's best for you. I recommend the stable versions: Downloads - ps3mediaserver - Project Hosting on Google Code
2. Install the application
3. Open the application and turn on your PS3. If it doesn't already have the "Search Media Servers" option on your PS3 under Music, Videos, and Photos, go to Network Settings on the PS3 and turn it on
4. Search for Media Servers on your PS3 and eventually, the PS3 will pick up your computer. Go to the media server it found and browse through the folders until you find the location of the video, and that's it
NOTES:
Sometimes it may take a few tries and fooling around in order for the PS3 to find the media server
If the video/music you're playing is lagging, check out the FAQ section of the application
Saturday, 25 September 2010
How to jailbreak the PS3
First, check this for a list of compatible devices. Choose your device and follow the instructions given.
Second, download Backup Manager and put it on the root of a flash drive (or other memory device).
Third, follow these steps (taken from here):
Once you're ready, turn the switch off in the back of your PlayStation 3.
Make sure there are no other USB devices plugged into the PS3 (USB Stick, Sixaxis Controller, etc.).
Plug in your device and then switch the back power button on.
Once you have that done, quickly press the power button, then hit eject as fast as you can.
If it takes longer than usual to boot up, it was a success.
The PS3 should boot up and you will see two new options in the games portion of the XMB (cross media bar).
You can now safely disconnect your device and return it to normal operation mode while enjoying this exploit.
To use Backup Manager, simply plug in the flash drive you put it on, look for Backup Manager in the Games section, and install it.
The jailbreak is temporary; simply put, it goes away when the system is turned off, and unsigned applications/packages will no longer be usable. In order to jailbreak it again, simply repeat step three.
I hope this was simple enough for most of you to understand. I'll try to keep this updated if simpler methods are discovered.
Installing Other Operating System on Playstation 3
Install Manual - "Other OS" on a PS3
Requirements for Installing "Other OS"
-Personal computer (PC)
-PS3 (a free space of 10 MB or more must be available on the hard disk)
-PC with Internet
-Any of the following recording media with a free space of 10 MB or more:
-Reader/writer for the above Memory Stick, SD card, Compact Flash, or CD/DVD disc.
Step 1
Connect your PC with the storage media that you have selected from the list above
Step 2
Create folders to store the installer and the boot loader on the recording medium.
Using the PC, create a folder named "PS3" (no quotations) under the root directory of the recording medium you have prepared.
In the "PS3" folder you have just created, create another folder named "otheros" (no quotations).
You will store the file otheros.self from Step 3 into the "otheros" folder.
Step 3
Download the otheros.self installer from this site using the PC, and save it in the "otheros" folder you have created in step 2.
http://www.playstation.com/ps3-openp...a/otheros.self
Note
The following conditions have to be true for the PS3 to recognize the installer:
The file has been saved in the "otheros" folder.
The file has been saved with the name "otheros.self".
The folder and/or file name contains no double-byte character.
Step 4
Obtain the boot loader file for the "Other OS" you want to install from the provider. In this case (Yellow Dog Linux), we get the boot loader file otheros.bld from Terrasoft:
http://www.terrasoftsolutions.com/su...s3/otheros.bld
Then save the otheros.bld boot loader file in the "otheros" folder created in step 2 with the name, "otheros.bld".
Step 5
Insert the recording medium on which the installer is saved into the card slot, disk drive, or the USB port of the PS3. Do not turn off the power or remove the recording medium during the installation. Interrupting the installation process may cause damage.
Step 6
Select [Install Other OS] from [System Settings] of [Settings] on the PS3's normal home menu. This initiates a search for the installer and displays its location. Click [OK] to start the installer.
Step 7
Perform the installation according to the instructions displayed by the installer. Once the installation completes, The [Default System] menu item appears in [System Settings] of [Settings] on the home menu .
Starting Boot Loader
After you have completed the installation in step 7, specify "Other OS" by selecting menu items in the following order: home menu > [Settings] > [System Settings] > [Default System] > "Other OS". This causes its boot loader to be started every time PS3 boots up.
For information about the way to switch from the "Other OS" to the PS3 system software, contact the provider of the "Other OS".
FYI, the PS3 system software can be forcibly booted up even when an "Other OS" has been selected as 「Default System」by holding down the Power button for about 5 seconds or more at power on, although this forcible boot resets the screen resolution to the factory default.
Requirements for Installing "Other OS"
-Personal computer (PC)
-PS3 (a free space of 10 MB or more must be available on the hard disk)
-PC with Internet
-Any of the following recording media with a free space of 10 MB or more:
- USB memory device
- USB-connectable hard disk
- Empty CD-R, CD-RW, DVD-R, DVE+R, DVD-RW, DVD+RW, BD-R, or BD-RE disc
- Memory Stick
- SD memory card
- Compact Flash
-Reader/writer for the above Memory Stick, SD card, Compact Flash, or CD/DVD disc.
Step 1
Connect your PC with the storage media that you have selected from the list above
Step 2
Create folders to store the installer and the boot loader on the recording medium.
Using the PC, create a folder named "PS3" (no quotations) under the root directory of the recording medium you have prepared.
In the "PS3" folder you have just created, create another folder named "otheros" (no quotations).
You will store the file otheros.self from Step 3 into the "otheros" folder.
Step 3
Download the otheros.self installer from this site using the PC, and save it in the "otheros" folder you have created in step 2.
http://www.playstation.com/ps3-openp...a/otheros.self
Note
The following conditions have to be true for the PS3 to recognize the installer:
The file has been saved in the "otheros" folder.
The file has been saved with the name "otheros.self".
The folder and/or file name contains no double-byte character.
Step 4
Obtain the boot loader file for the "Other OS" you want to install from the provider. In this case (Yellow Dog Linux), we get the boot loader file otheros.bld from Terrasoft:
http://www.terrasoftsolutions.com/su...s3/otheros.bld
Then save the otheros.bld boot loader file in the "otheros" folder created in step 2 with the name, "otheros.bld".
Step 5
Insert the recording medium on which the installer is saved into the card slot, disk drive, or the USB port of the PS3. Do not turn off the power or remove the recording medium during the installation. Interrupting the installation process may cause damage.
Step 6
Select [Install Other OS] from [System Settings] of [Settings] on the PS3's normal home menu. This initiates a search for the installer and displays its location. Click [OK] to start the installer.
Step 7
Perform the installation according to the instructions displayed by the installer. Once the installation completes, The [Default System] menu item appears in [System Settings] of [Settings] on the home menu .
Starting Boot Loader
After you have completed the installation in step 7, specify "Other OS" by selecting menu items in the following order: home menu > [Settings] > [System Settings] > [Default System] > "Other OS". This causes its boot loader to be started every time PS3 boots up.
For information about the way to switch from the "Other OS" to the PS3 system software, contact the provider of the "Other OS".
FYI, the PS3 system software can be forcibly booted up even when an "Other OS" has been selected as 「Default System」by holding down the Power button for about 5 seconds or more at power on, although this forcible boot resets the screen resolution to the factory default.
How to make your own xbox 360 theme
Make your onw theme using Modio. only modio -------------> (no xplorer360, xport360, usbxtafgui included in this tutorial)
This just shows you where to find the theme creator if you are new to modio.
Requirements for just making the theme..
1. Modio
The Steps to make your theme!
1. Open Modio
2. Click on the "M" in the top left corner of Modio. (a guide for the options that you have to use)
3. Find other tools
4. Click on theme creator
5. Load an image in each of the boxes.
6. Select The base color that you want.
7. Save them to where you want it.
Congratulations! You made an xbox 360 theme!
http://www.youtube.com/watch?v=9YfJITF9x_w&feature=player_embedded
How to make a rapid fire controller for an xbox 360
THIS DOES NOT WORK FOR WIRED CONTROLLERS
Every one wants to know how to make them, but no one wants to tell you. Well now you will learn how to make a rapid fire controller for under $10. If you don't have a soldering iron or any wire it is about $30.
What you need:
-1 Soldering Iron
- 1 Lead free solder
- 1 Torx Security bit screw driver
- 1 Insulated wire (30AWG)All these can be found here
That is the cheapest spot I found to get those.
Now the parts that actually do your rapid fire
- 1 button *can be found here* $2.49
- 1 old matrix wireless controller
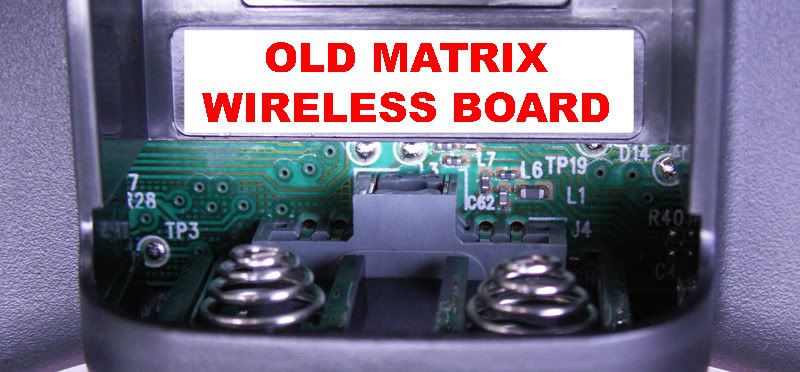
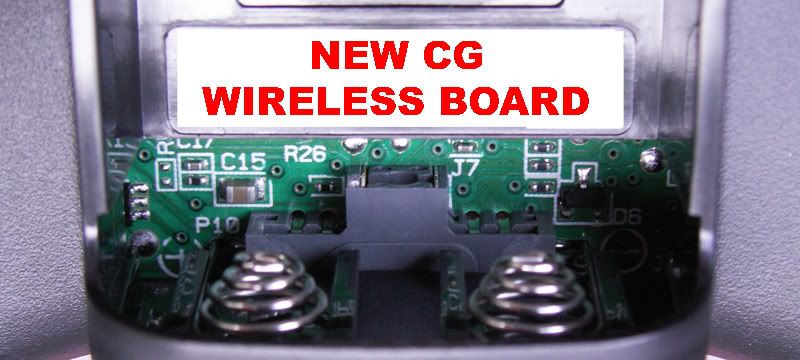
* If you do not have the old matrix go to bottom of this page for a different tut*
Lets mod:
Step One: Open your controller, find out if it is a matrix or not. See Pictures above. If it is not a matrix you can go to the second tut below.
Step Two: Solder a wire to each pin on the button.

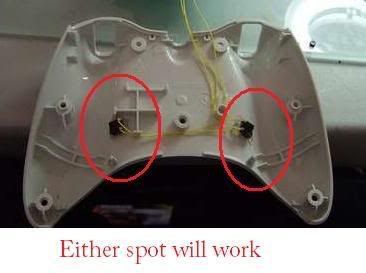
Step Three: Once you have both wires soldered onto the button you will need to find a spot where you would like the button to be. Most of the time people put the button on the bottom of the controller. All you have to do is get a small drill and drill a hole in the bottom of the controller case. Then use a nail file or metal file if you have one and make it into the same shape and size of your button. When you have the right size, place the button into the whole and glue it in to place. The button needs to have the wires on the inside of the controller and the button on the outside - bottom of the controller.
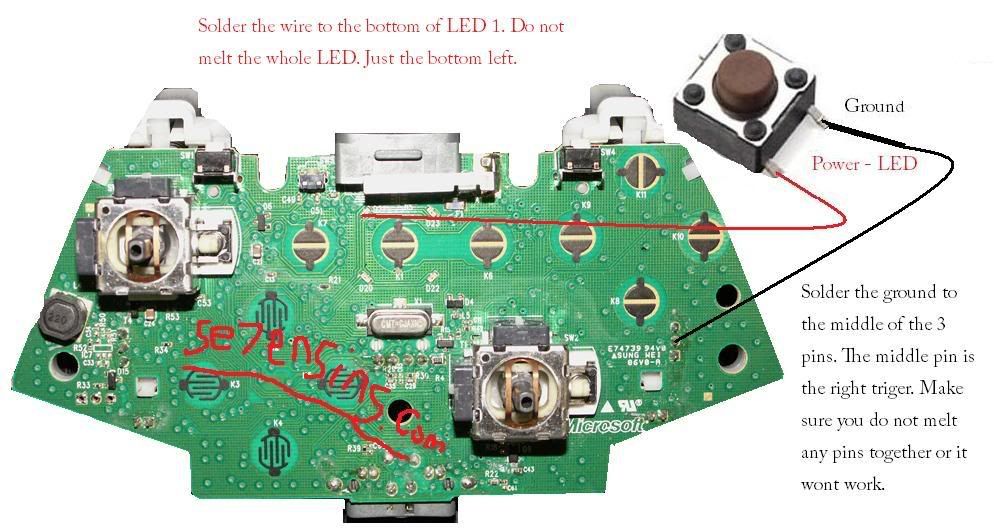
Step Four: This is the hardest part in the whole project. You need to make sure you take your time. You will now need to solder the wires to LED 1 and the right trigger. When soldering the wires to their locations you should only have to touch it for a second and then it be soldered. Do not hold it there or you could risk ruining your whole controller. Have the positive wire go to LED1 and the ground go to the middle pin on the right side of the controller.
-
Step Five: Hide all the wires and get everything out of the way. Put the back on and then put in your batter pack. Go into COD4 and test it out. You will need to hold down the button in order to shoot. If you did everything right it should fire. If it does not work check your wires and make sure you soldered the ground to the middle pin. If it still doesn't work you may have damaged your led and as a result it wont work.
So you have a new controller and want to make it a rapid fire. No problem.
Things you will need:
- 1 Soldering iron with solder- This kit
This kit comes with a pre programmed chip so you can kick some serious ***.
Step One: Open your controller using the Torex security screw driver
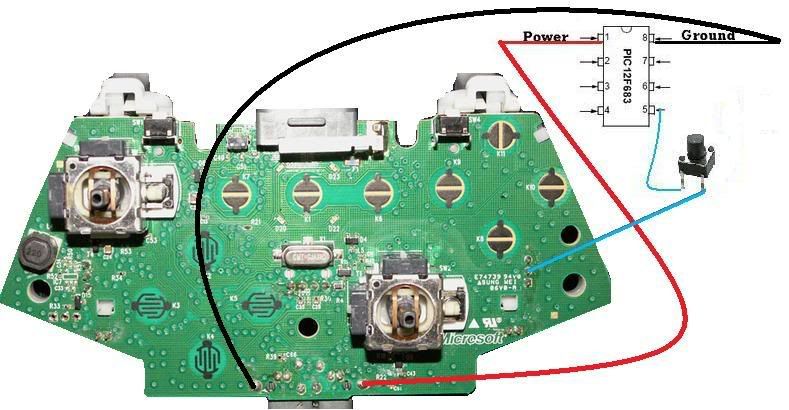
Step Two: Solder all the wires to the chip. One wire for power on pin one of the chip. A ground on pin eight on the chip. And a wire on pin 5 that goes to a pin on the button, then a wire from the other pin on the chip.
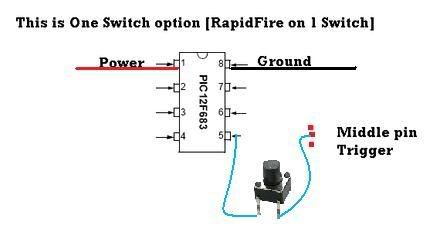
Step Three: Drill a small hole in the controller for the button. Most people put the button on the bottom but if you like it on the top put it there. This button will be the button that you will need to hold down in order to shoot in rapid fire mode. So put it some where, where you can get your trigger finger to reach it. Once you have the button in place glue it and move onto step four.
Step Four: Now it the hard part. You will need to be extremely careful when soldering the wires to the board. You do not want to try and force anything. You should only have to hold the iron down on the wire for a second. If it does not work, take it off and try again. Never hold the soldering iron on the board for an extended period of time. Connect the wires to their designated location.
Step Five: Once you have the wires connected put the chip some where inside the controller in a safe place. Put the back of the controller on and then put the battery pack on. Load up COD4 and test it out. You will need to hold down the button to shoot. If you get it to fire congrats you now have your very own rapid fire controller. If it does not work make sure you have ll the wires connected in the correct location.
Every one wants to know how to make them, but no one wants to tell you. Well now you will learn how to make a rapid fire controller for under $10. If you don't have a soldering iron or any wire it is about $30.
What you need:
-1 Soldering Iron
- 1 Lead free solder
- 1 Torx Security bit screw driver
- 1 Insulated wire (30AWG)All these can be found here
That is the cheapest spot I found to get those.
Now the parts that actually do your rapid fire
- 1 button *can be found here* $2.49
- 1 old matrix wireless controller
* If you do not have the old matrix go to bottom of this page for a different tut*
Lets mod:
Step One: Open your controller, find out if it is a matrix or not. See Pictures above. If it is not a matrix you can go to the second tut below.
Step Two: Solder a wire to each pin on the button.
Step Three: Once you have both wires soldered onto the button you will need to find a spot where you would like the button to be. Most of the time people put the button on the bottom of the controller. All you have to do is get a small drill and drill a hole in the bottom of the controller case. Then use a nail file or metal file if you have one and make it into the same shape and size of your button. When you have the right size, place the button into the whole and glue it in to place. The button needs to have the wires on the inside of the controller and the button on the outside - bottom of the controller.
Step Four: This is the hardest part in the whole project. You need to make sure you take your time. You will now need to solder the wires to LED 1 and the right trigger. When soldering the wires to their locations you should only have to touch it for a second and then it be soldered. Do not hold it there or you could risk ruining your whole controller. Have the positive wire go to LED1 and the ground go to the middle pin on the right side of the controller.
-
Step Five: Hide all the wires and get everything out of the way. Put the back on and then put in your batter pack. Go into COD4 and test it out. You will need to hold down the button in order to shoot. If you did everything right it should fire. If it does not work check your wires and make sure you soldered the ground to the middle pin. If it still doesn't work you may have damaged your led and as a result it wont work.
So you have a new controller and want to make it a rapid fire. No problem.
Things you will need:
- 1 Soldering iron with solder- This kit
This kit comes with a pre programmed chip so you can kick some serious ***.
Step One: Open your controller using the Torex security screw driver
Step Two: Solder all the wires to the chip. One wire for power on pin one of the chip. A ground on pin eight on the chip. And a wire on pin 5 that goes to a pin on the button, then a wire from the other pin on the chip.
Step Three: Drill a small hole in the controller for the button. Most people put the button on the bottom but if you like it on the top put it there. This button will be the button that you will need to hold down in order to shoot in rapid fire mode. So put it some where, where you can get your trigger finger to reach it. Once you have the button in place glue it and move onto step four.
Step Four: Now it the hard part. You will need to be extremely careful when soldering the wires to the board. You do not want to try and force anything. You should only have to hold the iron down on the wire for a second. If it does not work, take it off and try again. Never hold the soldering iron on the board for an extended period of time. Connect the wires to their designated location.
Step Five: Once you have the wires connected put the chip some where inside the controller in a safe place. Put the back of the controller on and then put the battery pack on. Load up COD4 and test it out. You will need to hold down the button to shoot. If you get it to fire congrats you now have your very own rapid fire controller. If it does not work make sure you have ll the wires connected in the correct location.
How to flash any xbox 360 dvd drive with a laptop
*Confirmed to work with All Drives.*
You will need to buy an PCMIA VIA card with VIA VT6421 Chipset to do this.
I recommend buying this one: China wholesale product -china wholesale products, since it is cheap (only $9.81 +tax/shipping) *Make sure you have an PCMIA slot, not a express card slot before buying this*
Here are the drivers you will need to install the VIA Card:
http://rapidshare.com/files/301161439/via_raid_v530c.zipI do not recommend installing the files on the disc included, so install the drivers i have posted.
Now you will need to install Port I/O:
Port I/O Files:
http://rapidshare.com/files/287138939/manual_install.rarFor Vista: How to install Port I/O in Vista
For Windows 7: How to install Port I/O on Windows 7
Here's how to install Port I/O In Windows XP:
1. Open the Control Panel.
2. Open the "Add Hardware" wizard. If you are using Windows XP's default "Category View" for the Control Panel, this is done by clicking on "Printers and Other Hardware" and under "See Also" on the left, click "Add Hardware".
3. The wizard typically displays a screen explaining what it is used for. Click Next to continue.
4. The wizard may automatically scan for new hardware. The scanning will not detect anything related to PortIO32.
5. You may be asked "Have you already connected this hardware to your computer?" Regardless of whether you have installed any cards yet, click Yes.
6. You will be shown a list of the hardware already installed in your computer. Scroll all the way down and select "Add a new hardware device"
7. You will be asked whether Windows should search for the new hardware. Select "Install the hardware that I manually select from a list"
8. A list of hardware categories will be shown. Select "Show All Devices" (On some versions of Windows this may be called "Other")
9. Click the "Have Disk" button and point Windows to the "windriver" directory of the PortIO32 distribution.

10. A list of drivers found in the directory you specified will be shown. Select the "PortIO32 Xbox 360 Device Driver" item and click Next.
11. Click Next again to "start installing your new hardware."
12. The files will be copied and installed. Click Finish to complete. You do not need to restart your computer.
Now all the hardware is installed!!
Now to flash the drive you can use any tut that you want to use.
I recommend using JungleFlasher to flash your drives.
Links for JungleFlasher:
(Credit goes to Carson from his tut: http://www.se7ensins...gleflasher.html)
JungleFlasher
Tut on How to Flash Xbox 360 Drives by Team Jungle
You will need Adobe Reader to view the tut.
Adobe Reader
Subscribe to:
Posts (Atom)